Awesome Triaramas in Grade Three

Grade three just finished making their triaramas. I love doing these because they are so versatile and adaptable to any theme or lesson you teach.

For these, the students had to recreate their favorite room in their house. The instructions are quite simple. Give each student a square paper. They fold it in half and trace over the line. They turn it to look like a diamond shape and cut a line up to the fold line.  For detailed direction you can go here.

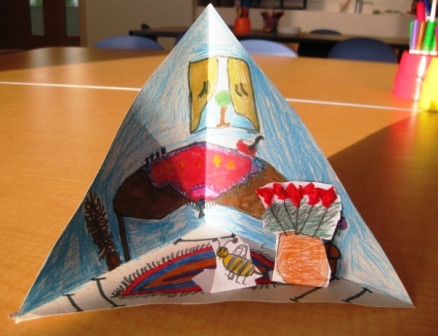
The top triangle is for the background. They can also add details to one of the bottom cut sections as long as it is the visible one as the other will be folded under and pasted to give the triarama shape.

Finally with recycled paper they can add details that will be ‘standing’ and will become the foreground and will bring their triarama to life! Let their imagination go wild and have lots of fun.

Isn’t this cute? I love the flower pot!

Psst…

Art Lessons for Kids is on Facebook  and we are GROWING. Hit the  ”Like” button to show your LOVE  and join the conversation. You can also follow my adventures on Twitter (@Ms_Alejandra) or see what I am pinning over at Pinterest.

Sign up today for The Happy Whole Teacher messages and get some lovin’ pep talks to keep you happy, balanced, energised and inspired. Click on the image below to join for FREE. I would love to have you in my tribe.

Become whole again and change your life.  Let me show you how.

Become whole again and change your life. Let me show you how.

Cardboard Collages in Kinder

014

End of year means you have a lot of excess cardboard lying around  so what better way to use it then by doing a lesson on collage!

I cut up a bunch of cardboard into different sizes and put them in trays for kids to choose freely. Each child was given a larger cardboard where their creations would be glued.

They ‘planned’ their ideas and placed pieces all around and ‘layered’ other pieces. They don’t need to make a picture but to just to have fun arranging the cardboard pieces to make an ‘abstract’ work of art. Of course some ended up making a picture which was Ok too.

The kids really enjoyed this and were ready to glue each piece. This was tricky because they had to move the pieces around , glue and remember where everything went. This was a great opportunity for them to be patient, and to really think about what they were doing.

Finally when everything was glued and dry they painted they work. Make sure the students paint two layers and are careful to paint around the pieces. Some experimented with splattering paint and the effect was great.

Didn’t these come out beautiful?


Sign up today for The Happy Whole Teacher messages and get some lovin’ pep talks to keep you happy, balanced, energised and inspired. Click on the image below to join for FREE. I would love to have you in my tribe.

Become whole again and change your life.  Let me show you how.

Become whole again and change your life. Let me show you how.