Torn Paper Lines

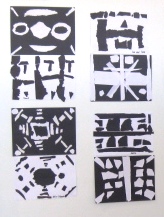
Here is a neat idea you can do the next time you need to teach LINES. Get your students to ‘feel‘ the lines by tearing out all sorts of lines using only their fingers and imagination!
For this lesson, I like to give out 2 colored papers either to individual students or to pairs. In today’s lesson I gave out white and black paper because the contrast is quite dramatic but you can use any color combination such as a warm and cool color, complimentary colors, different shades, etc. Tell your students one color is for tearing lines out and the other is for glueing the lines on.
My grade three class worked in pairs. We discussed and reviewed the different kinds of lines and how to tear paper and give it the shape we want. Teach your students to gently make little tears and to use their thumb as a guide and ‘ruler‘. The students got into pairs and talked about which lines they wanted to tear. They placed the torn lines on the paper and decided on a nice composition.  Here your students can place lines symmetrically or make a picture depending on the grade level. We went for a symmetrical composition because they were learning about this in math.

tearing lines

tearing lines

playing around with the lines for composition

playing around with the lines for composition


Once the teams were happy with their lines the next step was to glue them down on the paper. They then were given the same colored paper and had to make the same or another design using the opposite color. If the students started with tearing white paper on black then they would do tearing black lines on white paper.
This lesson can be adapted to many grade levels and the result is quite lovely.

pasting1

img_13041

Sign up today for The Happy Whole Teacher messages and get some lovin’ pep talks to keep you happy, balanced, energised and inspired. Click on the image below to join for FREE. I would love to have you in my tribe.

Become whole again and change your life.  Let me show you how.

Become whole again and change your life. Let me show you how.

Fractured Art

I am always trying to think of creative ways to reinforce some of the elements of art. Here is a great project that will help you do just that.  Kids will learn or review, depending on the age level, lines, primary colors, shape, space and even value.

After discussing these elements, give your students a 12 x 18 piece of white paper, pencil and ruler. They are to make a mix of vertical, diagnal and horizontal lines that can either be straight, zig-zag or wavy. Once they have outlined their lines with a black crayon, they go to the painting station where there are paint cups with the primary colros waiting for them. Go over the routine of how to use a brush (wash your brush between colors) and starting with one primary color they paint diferent sections of their paper. Remind them that two same colors cannot be next to each other! Then they go onto the next primary color and so on.

Dividing the paper into sections

Dividing the paper into sections

Once their painting is dry, they need to cut up their paper and keep the pieces in the same order they are cutting them because they will glue them down onto a large piece of black paper, kind of like a jig saw puzzle. When they glue them down, there remind them to keep a small space between strips.

Painting in each section

Painting in each section

The final result is beautiful and the kids love to see them when they are finished. this project can be adapted to any age level. Instead of painting with the primary colors you could paint different shades or tints of a hue (color), use only warm or cool colors, complementary colors, etc. The possibilties are endless!


Sign up today for The Happy Whole Teacher messages and get some lovin’ pep talks to keep you happy, balanced, energised and inspired. Click on the image below to join for FREE. I would love to have you in my tribe.

Become whole again and change your life.  Let me show you how.

Become whole again and change your life. Let me show you how.

Color Wheels

Grade one color wheel

Grade one color wheel

Teaching how a color wheel works is fun for kids and it teaches primary and secondary colors. I decided that all of my grades would make different kinds of color wheels. I am big on displays so I thought that it would look lovely for a final display.

Essentially, a color wheel is a tool to visually see the postion of the primary colors and the secondary colors which are mixed from  red, yellow and blue. Experiment beforehand with this and have your students mix, mix mix! They love this and it’s important for them to get as much hands on experience because you learn so much more from DOING!

After the kids have mixed, explored and discovered,  they are ready to make their own color wheels. Here are some samples of some of the color wheel my students made. Grade one made theirs the following way. I gave out pre- cut cardboard circles and then gave out a 9 x 12 piece of white paper which the students folded into 6 sections. Their instructions were to draw 3 identical shapes and paint them with the primary colors.  The shapes needed to be simple with no details and just an outline. Then they made an outline of three other identical shapes. Their challenge was to make the secondary colors by mixing two primary colors together. They needed to make 3 new colors. I gave out plastic plates with some red, yellow and blue paint. Tip: plastic plates can be washed an re- used again and again!

They collected their water container, paint brush and protective paper for the table. It’s good to remind the students that they must keep their three colors ‘clean’ and can mix colors on another part of their plate. They must remember to wash their brush between colors using their water cup and dry their brush on the protective paper before mixing or changing colors. This is a routine that needs to be done over and over till they get it and it’s automatic.

Once they made their new colors (green, orange and purple), they painted their remaining shapes. I then gave out their cardboard circles and they made some lines on them for divisions and painted them in using black and white. When everything was dry, they glued their ‘primary color’ shapes at the 12 , 3 and 9 o’clock marks on their circles and the secondary colors inbetween the primary colors. Then they glued yarn between the primary and secondary colors.

With my grade two class we made color wheel pizzas. These were a lot of fun and the kids loved doing them. They also looked stunning once they were finished and displayed. See my display page for ideas. Anyway, after the kids experimented mixing colors and could tell me how to make the secondary colors,  I gave them a giant pre-cut cardboard circle which they divied up into 6 sections. They colored the primary colors and secondary color sections with crayon and then had to fill in each section with ‘toppings’ which were different kinds of paper and magazine cut outs for each color. They brought in from home other toppings such as balloons, wrapping paper etc.. When they were finished , the students sprinkled each section with glitter ‘cheese’. The end result was gorgeous and delicious!

Starting with the primary colors

Starting with the primary colors

Adding the toppings

Adding the toppings


Gorgeous results!

Gorgeous results!