I save absolutely everything because I know that sooner or later I will be inspired to use it with a lesson. This is what happened with the vinyl packages that my art aprons came in. Instead of ending up in the garbage I cut them open at the seams and suddenly they were now ‘glass’ for a stained glass project I had in mind with my Pre-K class.
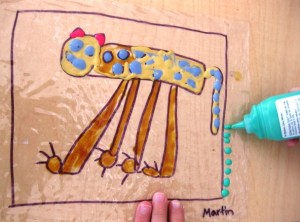
I gave my students a paper cut to the exact size of the vinyl sheet with a frame I made with markers and we talked about each others favorite animals or favorite things. The students then drew their animals or things such as flowers, lions, pumas, etc. within the frame and outlined it with a black marker. I placed the vinyl sheet on top and outlined their pictures with a black sharpie marker. While I was doing this with each child, everyone else colored their pictures while they waited for everyone’s vinyl sheet to be traced.

Next I showed them the ‘magic‘ paint (Plaid Gallery Glass window color) and showed everyone how to squeeze just the right amount to color in their pictures. I also demonstrated that an easy way to fill color into an area is to ‘squeeze and color in circles‘ -as the paint comes out they spread it around with the circular movements.
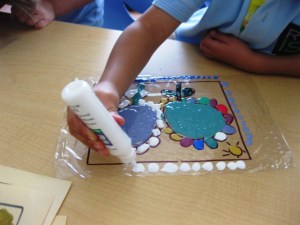
This was tricky at first but the kids got the hang of it in no time. Let them add quite a bit of paint and if the colors run into each other or go out of the lines a bit, all the better-the effect is wonderful!


When these dried the kids then put some dots and designs around the border to finish up. The beauty of vinyl is that it sticks to a glass surface quite easily and if you dampen the back a little it sticks even better.
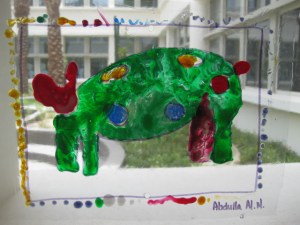
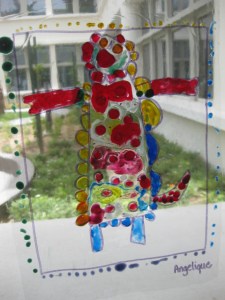

The hallway windows outside my class looked fabulous with all the stained glass pictures.
What do you think?
Psst…
Art Lessons for Kids is on Facebook and we are GROWING. Hit the ”Like” button to show your LOVE and join the conversation. You can also follow my adventures on Twitter (@Ms_Alejandra) or see what I am pinning over at Pinterest.