Eric Carle Art in Pre-Kindergarten

This gallery contains 15 photos.

I have to say that I LOVE Eric Carle’s beautiful art!  The colors and the textures he creates on tissue paper is magical and the whole process is easy and fun for any age. Pre-K is learning about insects and … Continue reading

Symmetrical Vases in Grade One

Frederik's Symmetrical Vase

I saw this idea on Oodles of Art and thought it would be a lovely lesson to use with my grade one class since they were learning about symmetry in math class. I know this because my son Sebey is in Grade one!

We talked about symmetry and discussed the things that we knew were symmetrical and they were quite suprised to find out that their faces and their bodies were symmetrical too! I demonstrated this by calling up different students and pretending to cut them in half and folding them!

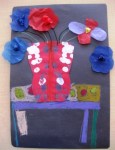
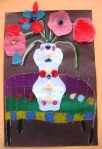
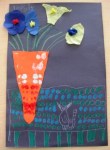
Next we talked about flowers in vases and where you put them to show them off and we all agreed they should be placed on a table with a nice tablecloth! I gave out a large black paper and kids drew their large tables and colored the tablecloths with oil pastels.

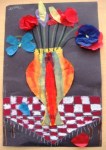
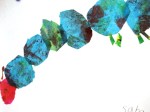
The symmetrical vases were made by folding a colored piece of construction paper in half and drawing half a design of a vase starting at the fold. They were cut out and then the students put paint blobs on one side of their vase and the middle section. They closed it , moved the paint around inside and opened it up to discover symmetrical designs on their vases–they LOVED this part!  Once dried, the vase was glued somewhere on their tablecloth, the flowers were made with tissue paper and the stems were drawn with oil pastels.

Pretty don’t you think?

Scratch Art Fun in Grade 1

Ny'a's Horse

Ny'a's Horse

Scratch art is one of those lesson kids of all ages LOVE to do and although it’s very easy for us teachers to buy the ready made scratch art paper, I much prefer my students to learn from ‘scratch’ how to make make their own.

I gave out 9×12 white paper and crayons and told the kids they had to fill the whole paper with different colors and designs. I reminded them that for their paper to be ‘magic’ they needed to color in heavily and the only color they couldn’t use was BLACK! It’s amazing what happens when you use the word ‘magic‘. The kids get excited with anticipation and are just transported to their own creative space.


The finished designs were gorgeous and if I had been doing a lesson on lines and design this would have been just great.  Next I gave out black crayons and told the the kids to cover their entire paper with black by coloring very heavily and trying to make sure no colors could be seen. They couldn’t believe they were covering up their designs!  (Note: I used black india paint with a previous class and it was very hard for them to scratch out a picture so I think a black crayon works better and the effect is stunning.)

Next, I gave out scratching tools like some wooden stylus’ and explained that this tool would help them draw and color anything on their paper while they were ‘scratching’  out their design.  I even made them blow on the tip of the tool for special effect.

The ‘ooohs’ and ‘aaahs’ are immediate as soon as they start to ‘draw’ and the vibrant colors start to appear magically before their eyes –this is priceless!

This lesson can be adapted to any age level so give it a go and forget about buying the ready made paper. This is more exciting and creative by far. Try to display them against a sunny window because the colors look shiny and they look gorgeous too!

Sebey's Scarab Beetle

Sebey's Scarab Beetle

Yasmin's Butterfly

Yasmin's Butterfly

Anisa's Penguin

Anisa's Penguin

If you know anyone that might find this post useful, I’d really love it if you share this with your fans or followers today. All it takes is a simple click on the ‘like’  and share buttons below. Thanks!

PS: Did you know Art Lessons for Kids has a Facebook page and you can follow my adventures on Twitter (@Ms_Alejandra)? Click on over!